AWS S3 Presigned URLs and Deepgram
Your audio data may contain sensitive information and it’s critical that your data stays private. AWS S3’s presigned URLs can be leveraged to securely send audio data to Deepgram and securely receive transcripts from Deepgram.
What are Presigned URLs?
Section titled “What are Presigned URLs?”In this guide we’ll walk you through how to leverage presigned URLs to 1) send audio data from S3 to Deepgram and 2) upload transcripts generated by Deepgram directly to S3.
But first of all, what is a presigned URL?
A presigned URL is a time-limited URL that provides temporary access to an object stored in an S3 bucket. Presigned URLs provide a flexible and secure way to grant temporary access to S3 objects without compromising the security of your AWS credentials or making the object publicly accessible. Presigned URLs are commonly used in scenarios where you want to grant temporary access to private S3 objects to specific individuals or applications, which makes them a perfect fit for sharing audio data with Deepgram.
Before you Begin
Section titled “Before you Begin”Create an AWS Account, an S3 Bucket, and Upload an Audio File
Section titled “Create an AWS Account, an S3 Bucket, and Upload an Audio File”If you don’t already have an AWS account, you can create one on the AWS Console.
Once you’re logged into AWS, create a bucket in S3 here. Note that bucket names must be globally unique, so you may need to create a bucket with a long name, such deepgram-audio-and-transcripts-<your-name>. You can use the default bucket configurations when creating the bucket.
Next, upload an audio file to your bucket. We recommend creating two folders, one called audio and another called transcripts, then uploading your audio files into the audio folder. Here is the sample audio file we are using in this guide.
Setup the AWS Python SDK
Section titled “Setup the AWS Python SDK”Enable Programmatic Access to AWS
Section titled “Enable Programmatic Access to AWS”You will need to enable programmatic access to AWS to use the AWS SDKs. After logging into the AWS Console, follow the steps below:
-
Click on IAM → Users → select your user → Security Credentials → Access Keys → Create Access Key → Application running outside AWS → Next → Create access key. Do not close the web page until you complete Step 4!
-
Create or open the shared AWS
credentialsfile. This file is~/.aws/credentialson Linux and macOS, and%USERPROFILE%\\.aws\\credentialson Windows. For more information, see AWS’s Configuration and credential file settings. -
Add the following text to the shared
credentialsfile.Markdown [default] aws_access_key_id = AKIAIOSFODNN7EXAMPLE aws_secret_access_key = wJalrXUtnFEMI/K7MDENG/bPxRfiCYEXAMPLEKEY -
Replace the
aws_access_key_idandaws_secret_access_keywith the values created in Step 1.
Now, when the AWS SDK is loaded, your user’s programmatic access will be used by default.
Install the AWS Python SDK
Section titled “Install the AWS Python SDK”The AWS Python SDK is called boto3. You can find the docs here.
To install boto3, run pip install boto3.
Sending Audio Data to Deepgram Using a Presigned URL
Section titled “Sending Audio Data to Deepgram Using a Presigned URL”Once you have an audio file uploaded to one of your S3 buckets, you can generate a presigned URL very easily from the AWS S3 website: Click on your audio file, then going to “Object actions” in the top-right corner, and click “Share with a presigned URL”.
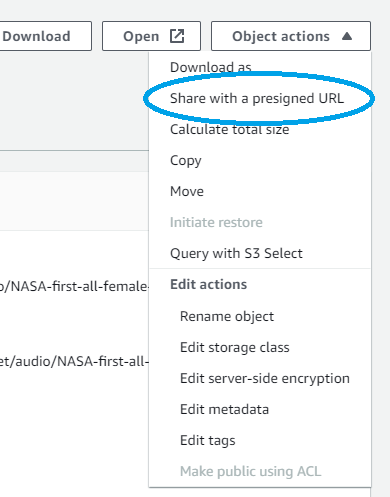
The presigned URL will be copied to your clipboard, and if you paste it into your browser’s URL bar the file will be downloaded to your computer. If you carefully inspect the URL, you will notice query parameters such as Amz-Security-Token and X-Amz-Expires. These query parameters contain the credentials for secure access to your files.
We will use the AWS Python SDK (installed via pip install boto3) to programmatically create presigned URLs. The below code creates a presigned URL that retrieves a file from S3:
from botocore.client import Config
import boto3
# Initialize the AWS SDK with an S3 client
BUCKET_NAME = "presigned-url-example-bucket"  # Your S3 bucket
BUCKET_REGION = "us-east-1"  # The region your S3 bucket is in (visible in the `Properties` tab)
s3_client = boto3.client("s3", config=Config(signature_version="s3v4", region_name=BUCKET_REGION))
AUDIO_FILE_PATH_IN_S3 = "audio/NASA-first-all-female-space-walk.mp3"
EXPIRATION_TIME_IN_SECONDS = 10 * 60  # 10 minutes
# Create a presigned GET URL
get_url = s3_client.generate_presigned_url(
    ClientMethod="get_object",
    Params={"Bucket": BUCKET_NAME, "Key": AUDIO_FILE_PATH_IN_S3},
    ExpiresIn=EXPIRATION_TIME_IN_SECONDS,
)Nice work! Now you can include the get_url in your Deepgram API call to send the audio to Deepgram. Since the presigned URL contains the relevant security credentials, your data is safe from prying eyes.
Uploading Transcripts Directly to S3
Section titled “Uploading Transcripts Directly to S3”To programmatically create a presigned URL that uploads a file to S3, use the code below:
TRANSCRIPT_FILE_PATH_IN_S3 = "transcripts/NASA-first-all-female-space-walk.json"
EXPIRATION_TIME_IN_SECONDS = 10 * 60  # 10 minutes
# Create a presigned PUT URL
put_url = s3_client.generate_presigned_url(
    ClientMethod="put_object",
    Params={
        "Bucket": BUCKET_NAME,
        "Key": TRANSCRIPT_FILE_PATH_IN_S3,
        "ContentType": "application/json",
    },
    ExpiresIn=EXPIRATION_TIME_IN_SECONDS,
)
The presigned URL generated by this code allows any file to be uploaded to the S3 path specified by TRANSCRIPT_FILE_PATH_IN_S3. We will pass this URL to Deepgram via the callback query parameter. Note that this URL requires the requester to make a PUT request.
The presigned PUT URL’s expiration time must take into account the time it takes for the audio to be transcribed, which is why a default value of 10 minutes is used in this guide. Longer audio files will require longer expiration times for the PUT URL. You may need to find an expiration time that fits your use case.
Finally, you can combine the GET and PUT URLs in an API request to Deepgram to perform the transcription:
# For more Python SDK migration guides, visit:
# https://github.com/deepgram/deepgram-python-sdk/tree/main/docs
import os
from deepgram import DeepgramClient
DEEPGRAM_API_KEY = os.getenv("DEEPGRAM_API_KEY")  # Your Deepgram API Key
client = DeepgramClient(api_key=DEEPGRAM_API_KEY)
def transcribe_audio(get_url: str, put_url: str):
    response = client.listen.v1.media.transcribe_url(
        url=get_url,
        smart_format=True,
        model="nova-3",
        callback=put_url,
        callback_method="put"
)Putting It All Together
Section titled “Putting It All Together”Below is the full code for 1) generating presigned URLs, 2) sending your audio data to Deepgram, and 3) uploading transcripts directly into S3:
# For more Python SDK migration guides, visit:
# https://github.com/deepgram/deepgram-python-sdk/tree/main/docs
from typing import Tuple
from botocore.client import Config
from deepgram import DeepgramClient
import boto3
import os
DEEPGRAM_API_KEY = os.getenv("DEEPGRAM_API_KEY")  # Your Deepgram API Key
client = DeepgramClient(api_key=DEEPGRAM_API_KEY)
BUCKET_NAME = "deepgram-presigned-url-example-bucket"  # Your S3 bucket
BUCKET_REGION = "us-east-1"  # The region your S3 bucket is in (visible in the `Properties` tab)
s3_client = boto3.client("s3", config=Config(signature_version="s3v4", region_name=BUCKET_REGION))
def get_presigned_urls(audio_file_key: str, destination_transcript_key: str, expiration_time) -> Tuple[str, str]:
    get_url = s3_client.generate_presigned_url(
        ClientMethod="get_object",
        Params={"Bucket": BUCKET_NAME, "Key": audio_file_key},
        ExpiresIn=expiration_time,
    )
    put_url = s3_client.generate_presigned_url(
        ClientMethod="put_object",
        Params={
            "Bucket": BUCKET_NAME,
            "Key": destination_transcript_key,
            "ContentType": "application/json",
        },
        ExpiresIn=expiration_time,
    )
    return get_url, put_url
def transcribe_audio(get_url: str, put_url: str):
    response = client.listen.v1.media.transcribe_url(
        url=get_url,
        smart_format=True,
        model="nova-3",
        callback=put_url,
        callback_method="put"
    )
def main():
    # The name of the audio file that Deepgram will pull from your bucket to be transcribed
    audio_file = "audio/NASA-first-all-female-space-walk.mp3"
    # The name of the file that Deepgram will upload to the bucket with your transcription results
    dest_file = "transcripts/NASA-first-all-female-space-walk.json"
    # Time in seconds that the generated URLs will be valid
    expiration_time = 10 * 60  # 10 minutes
    get_url, put_url = get_presigned_urls(
        audio_file_key=audio_file,
        destination_transcript_key=dest_file,
        expiration_time=expiration_time,
    )
    transcribe_audio(
        get_url=get_url,
        put_url=put_url,
    )
if __name__ == "__main__":
    main()
Serverless Workflow with Lambda Functions and S3 Event Notifications
Section titled “Serverless Workflow with Lambda Functions and S3 Event Notifications”AWS Lambda functions are popular in serverless architectures and integrate seamlessly with the presigned URL workflow explained in this guide. There are a few nuances to using presigned URLs and accessing Deepgram in a Lambda function, so if you’re using a Lambda function then keep reading!
Allow Lambda Functions to Generate Presigned URLs
Section titled “Allow Lambda Functions to Generate Presigned URLs”If you are using a serverless infrastructure, you may want to use AWS Lambda functions to generate presigned URLs. Make sure the Lambda’s Execution Role contains permissions for the S3:PutObject and S3:GetObject actions. Below is an example policy statement:
{
	"Sid": "allow-presigned-url-access",
	"Effect": "Allow",
	"Action": [
		"s3:PutObject",
		"s3:GetObject"
	],
	"Resource": [
		"arn:aws:s3:::deepgram-presigned-url-example-bucket/transcript/*",
		"arn:aws:s3:::deepgram-presigned-url-example-bucket/audio/"
	]
}
Accessing Deepgram from AWS Lambda
Section titled “Accessing Deepgram from AWS Lambda”For a single REST call like this one, you don’t need any third-party packages. Python’s standard library includes urllib.request, which ships with every Lambda Python runtime — so there’s no need for the Deepgram SDK, a requests dependency, a Lambda Layer, or a container image. Below is the full code that can be used in a Lambda function (Python 3.13).
import urllib.request
import urllib.parse
from botocore.client import Config
from typing import Tuple
import boto3
import json
DEEPGRAM_API_KEY = "YOUR_DEEPGRAM_API_KEY"
BUCKET_NAME = "deepgram-presigned-url-example-bucket"  # Your S3 bucket
BUCKET_REGION = "us-east-1"  # The region your S3 bucket is in (visible in the `Properties` tab)
s3_client = boto3.client("s3", config=Config(signature_version="s3v4", region_name=BUCKET_REGION))
def get_presigned_urls(audio_file_key: str, destination_transcript_key: str, expiration_time) -> Tuple[str, str]:
    get_url = s3_client.generate_presigned_url(
        ClientMethod="get_object",
        Params={"Bucket": BUCKET_NAME, "Key": audio_file_key},
        ExpiresIn=expiration_time,
    )
    put_url = s3_client.generate_presigned_url(
        ClientMethod="put_object",
        Params={
            "Bucket": BUCKET_NAME,
            "Key": destination_transcript_key,
            "ContentType": "application/json",
        },
        ExpiresIn=expiration_time,
    )
    return get_url, put_url
def transcribe_audio(get_url: str, put_url: str):
    source = {"url": get_url}
    headers = {
        "Authorization": f"Token {DEEPGRAM_API_KEY}",
        "Content-Type": "application/json",
    }
    options = {
        "model": "nova-3",
        "smart_format": "true",
        "callback": put_url,
        "callback_method": "put",
    }
    params = urllib.parse.urlencode(options)
    url = f"https://api.deepgram.com/v1/listen?{params}"
    req = urllib.request.Request(
        url, data=json.dumps(source).encode(), headers=headers, method="POST"
    )
    with urllib.request.urlopen(req) as response:
        return json.loads(response.read().decode())
def lambda_handler(event, context):
    # The name of the audio file that Deepgram will pull from your bucket to be transcribed
    audio_file = "audio/NASA-first-all-female-space-walk.mp3"
    # The name of the file that Deepgram will upload to the bucket with your transcription results
    dest_file = "transcripts/NASA-first-all-female-space-walk.json"
    # Time in seconds that the generated URLs will be valid
    expiration_time = 10 * 60  # 10 minutes
    get_url, put_url = get_presigned_urls(
        audio_file_key=audio_file,
        destination_transcript_key=dest_file,
        expiration_time=expiration_time,
    )
    r = transcribe_audio(
        get_url=get_url,
        put_url=put_url,
    )
    return {
        'statusCode': 200,
        'body': json.dumps(r)
    }
Responding to Transcript Completion using S3 Event Notifications
Section titled “Responding to Transcript Completion using S3 Event Notifications”Once a transcript is uploaded to S3, it’s important for your application to know the transcription is complete. AWS has a feature called “S3 Event Notifications” that can trigger events in other AWS services when a file is uploaded to a certain bucket/location.
To enable event notifications for your S3 bucket, go to the Properties tab and scroll down to the “Event Notifications” section. You can set up event notifications to be triggered when an object is put into a specific directory in your S3 bucket, defined by a prefix.
Event notifications can trigger a Lambda function, and the event notification will include the full key/filename of the transcript that was uploaded to S3. Your serverless backend can then load the transcript and provide it to your users. If you do not wish to load the transcript into the Lambda’s memory, you can create another presigned GET URL to allow the client-side application to load the transcript directly in a safe and secure way!
Troubleshooting
Section titled “Troubleshooting”If you are receiving AccessDenied messages such as the one below, it’s likely the presigned URL has expired. Try setting a longer expiration time when creating the URL. Note that the presigned PUT URL’s expiration time must take into account the time it takes for the audio to be transcribed.
<?xml version="1.0" encoding="UTF-8"?>
<Error>
    <Code>AccessDenied</Code>
    <Message>Request has expired</Message>
    <X-Amz-Expires>120</X-Amz-Expires>
    <Expires>2023-06-06T21:28:06Z</Expires>
    <ServerTime>2023-06-07T19:52:03Z</ServerTime>
    <RequestId>ZK1CA2Z9FH9N7E49</RequestId>
    <HostId>J48F/Rz5bayiqj6FQ3kRIZ/5zNLfzPDlWdX8v6EsLITgTMb7wbEJIEC2l2QvNrIw86jl/fkGM+U=</HostId>
</Error>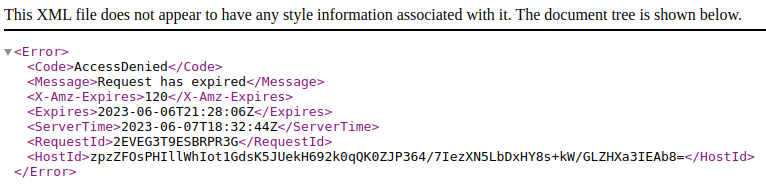
What’s Next